How to Build a FREE Elasticsearch GUI in 4 Steps
If you want to manage or retrieve data without coding, an Elasticsearch GUI might just be the tool for you.
Elasticsearch is used to perform fast searches, no matter how big your database is. It uses a series of ingenious solutions to preprocess data, allowing you to scale your database as much as you need, without sacrificing efficiency.
It has so many tools that it’s hard to make sure that you are getting the most out of it. For this reason, sometimes using just the command line won’t be a workable solution. It’s too easy to get lost or forget commands.
Enter Elasticsearch GUIs.
With a GUI you can use visual elements to interact with your Elasticsearch database. For instance, running commands and saving them for future use.
The best part is that you can build a custom UI for Elasticsearch for free, without even needing to write a single line of code.
You can use Budibase to connect to your database and run commands from it.
Our goal for today is to explore what you can do with a GUI and to outline how you can build your Elasticsearch GUI tool from scratch in just 4 steps.
Let’s get started!
Where is Elasticsearch used?
As the name suggests, Elasticsearch is used as a search tool. You can use it for customer-facing apps, or you can use it for internal apps, such as Business Intelligence solutions. There are different Elasticsearch versions that are popular for different use cases.
Elasticsearch is often an auxiliary DB that mirrors the main database and focuses only on search UIs and operations. This allows you to reduce the stress on your main DB for search functions, as these are usually quite resource-heavy.
Does Elasticsearch have a GUI?
No, Elasticsearch doesn’t have a GUI. There are many off-the-shelf Elasticsearch client GUIs though.
You can access Elasticsearch from your browser using Budibase without coding. Let’s build your custom Elasticsearch web UI, which allows you to use it with as many users as you want, and on any device with an internet connection.
How to access Elasticsearch from the browser?
You can access Elasticsearch from your browser using Budibase without coding. Let’s build your custom Elasticsearch GUI, which allows you to use it with as many users as you want, and on any device with an internet connection.
Today, we’re going to show you how easy it is to use our open-source low-code platform to build a fully custom Elasticsearch management UI. The demo GUI has four main screens, and a handful of additional forms.
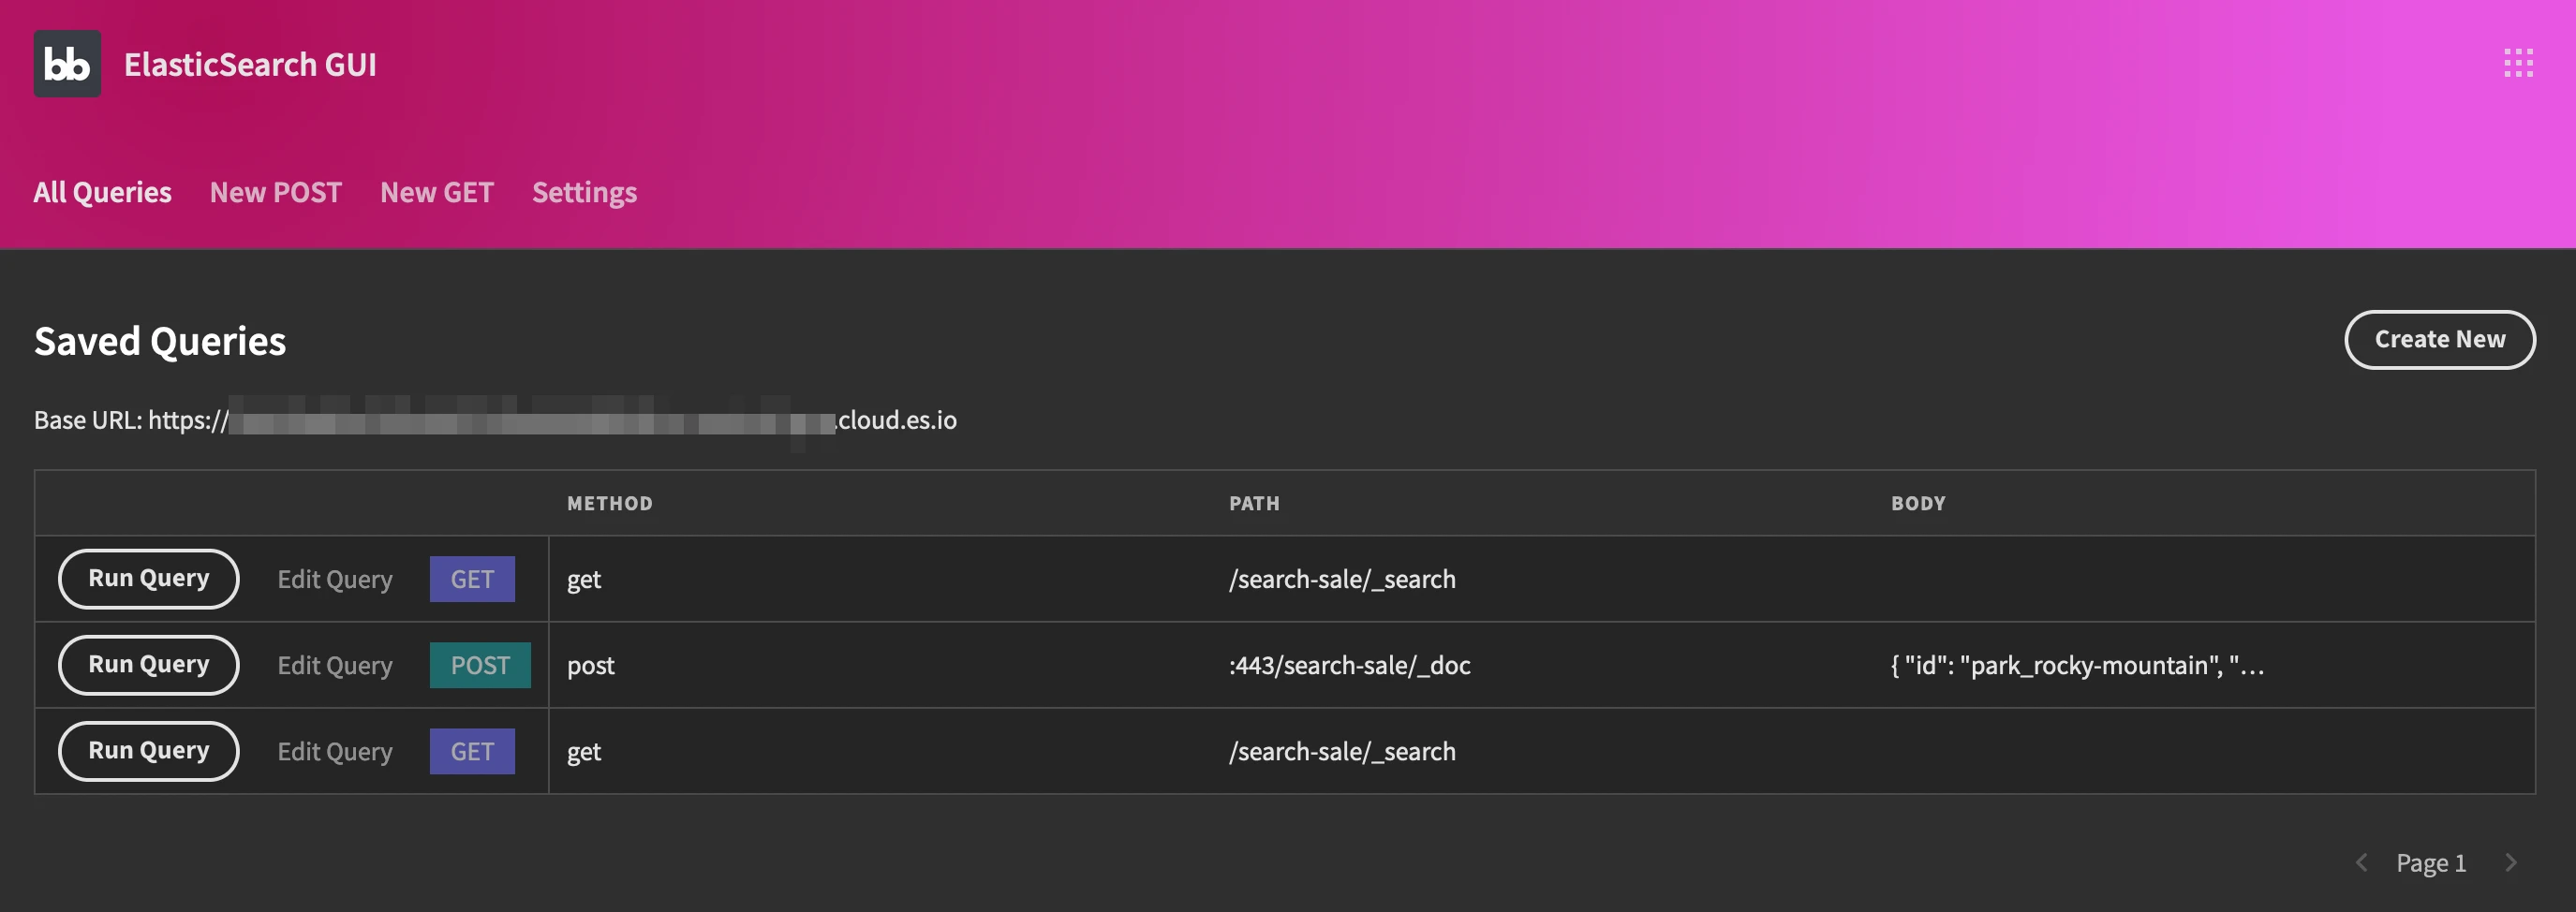
The first screen is the homepage. In it, you can see a list of the saved queries. From it you can run queries, edit them, or add entirely new ones:
If you click on edit/add new you’ll see a form like this

Next, there’s the POST request page. In it, you can select a base URL, and send requests to a path with a JSON body.
This allows you to send any command you want with your Elasticsearch GUI. In addition, this screen shows the result of your request. You can then save the query if you want to.
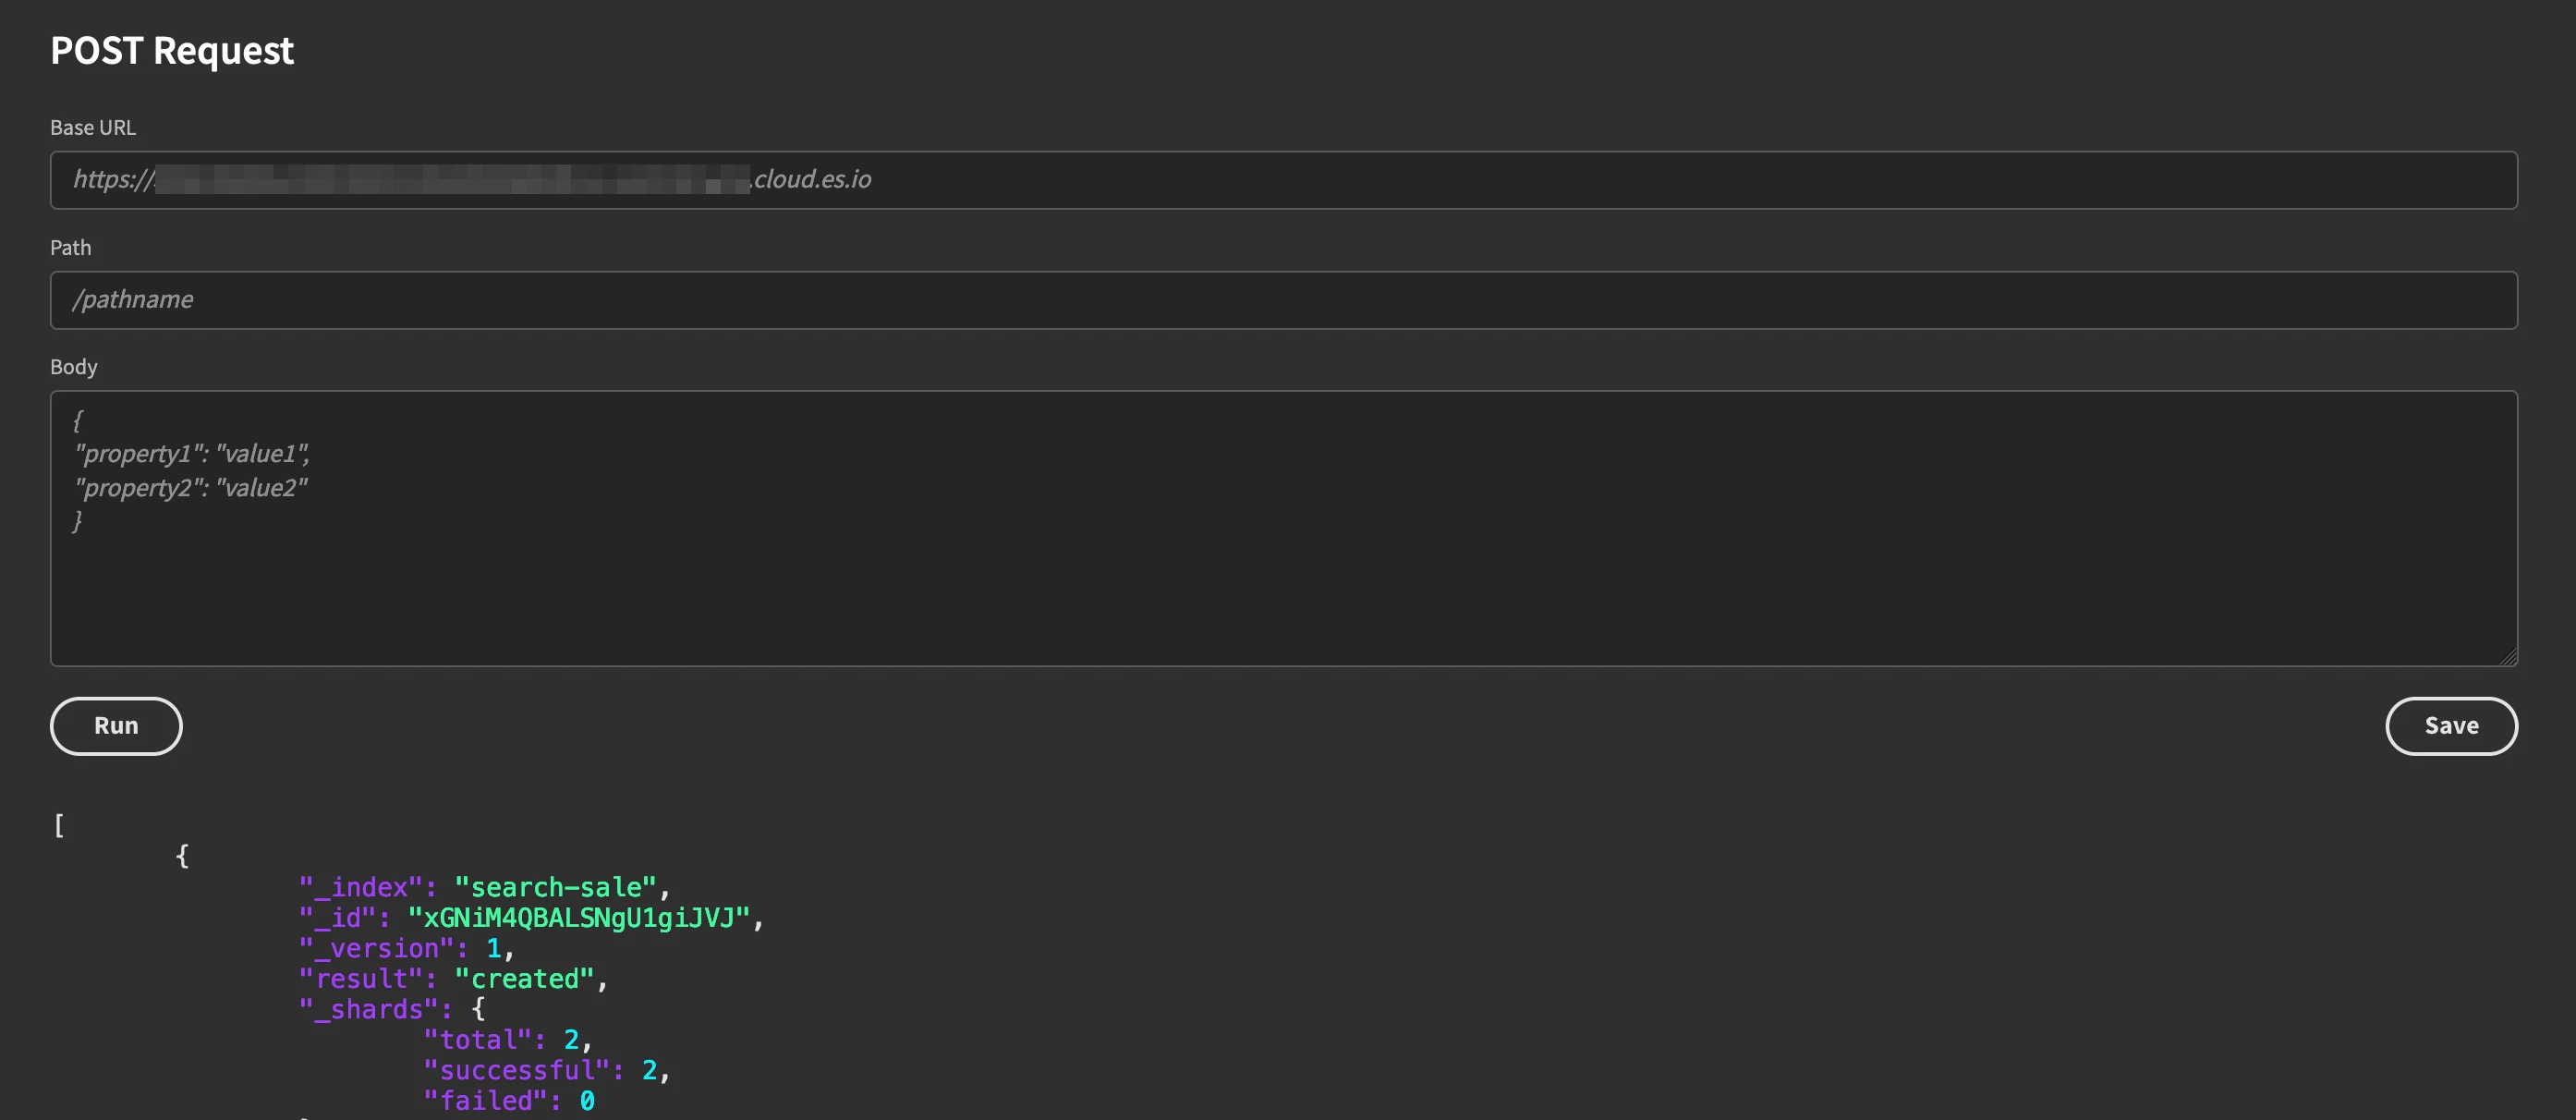
The GET screen is quite similar. It just omits the JSON body field. Likewise, in it, you can save queries, which are accessible later from your home screen.

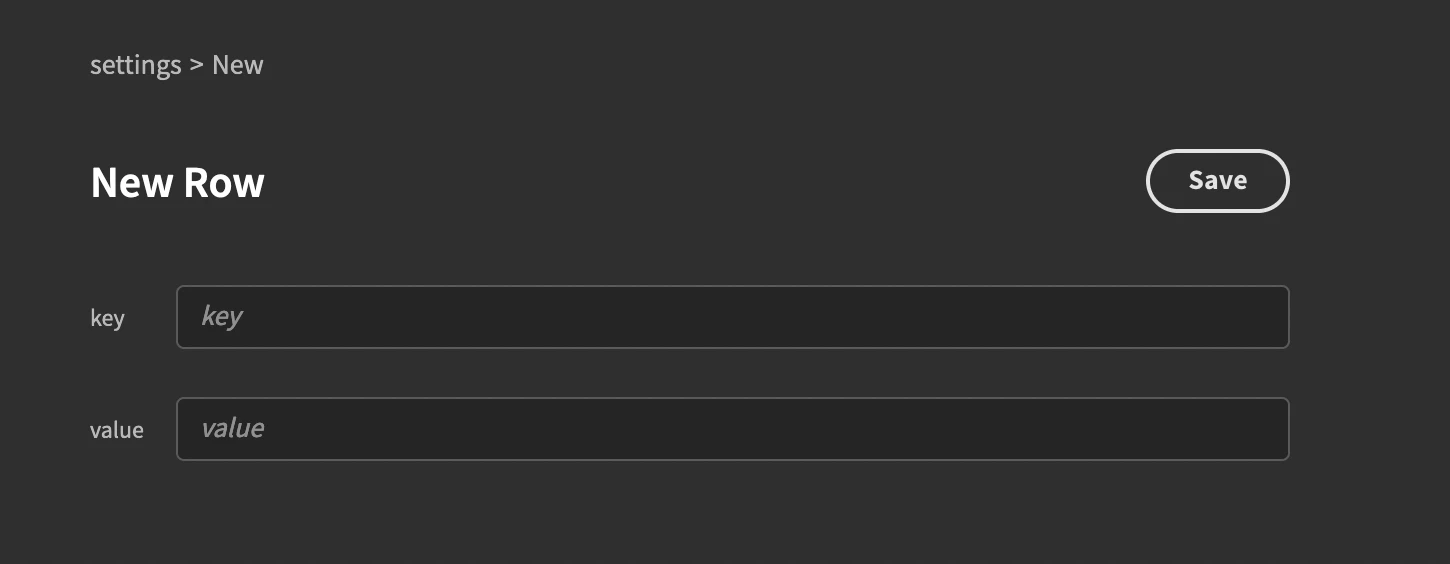
Finally, there’s the settings screen. It is quite similar to the first screen. In our example app, it has just one option, the baseURL.
But you can use it for any app settings you want.

You can edit or add new settings as well. Here is how these forms look:
You might also like our guide to building a Firebase GUI .
Now you know what you can do with your Elasticsearch GUI. Let’s look at how you can build it in Budibase.
Step 1 - Create your Elasticsearch GUI app and connect data
If you haven’t already, sign up for a free Budibase account. And if you just want to test out Elasticsearch, you can sign up for their free cloud account, that’s the quickest way to get started.
Then, create a new app.
You can select Elasticsearch as your data source. This is particularly handy if you are running an Elasticsearch cluster and Budibase on the same server. You can simply connect to it and it’s done.
But if you are using an external server (such as the cloud service for Elasticsearch) you might need alternative ways to connect to it.
The easiest is probably using the REST API data source:
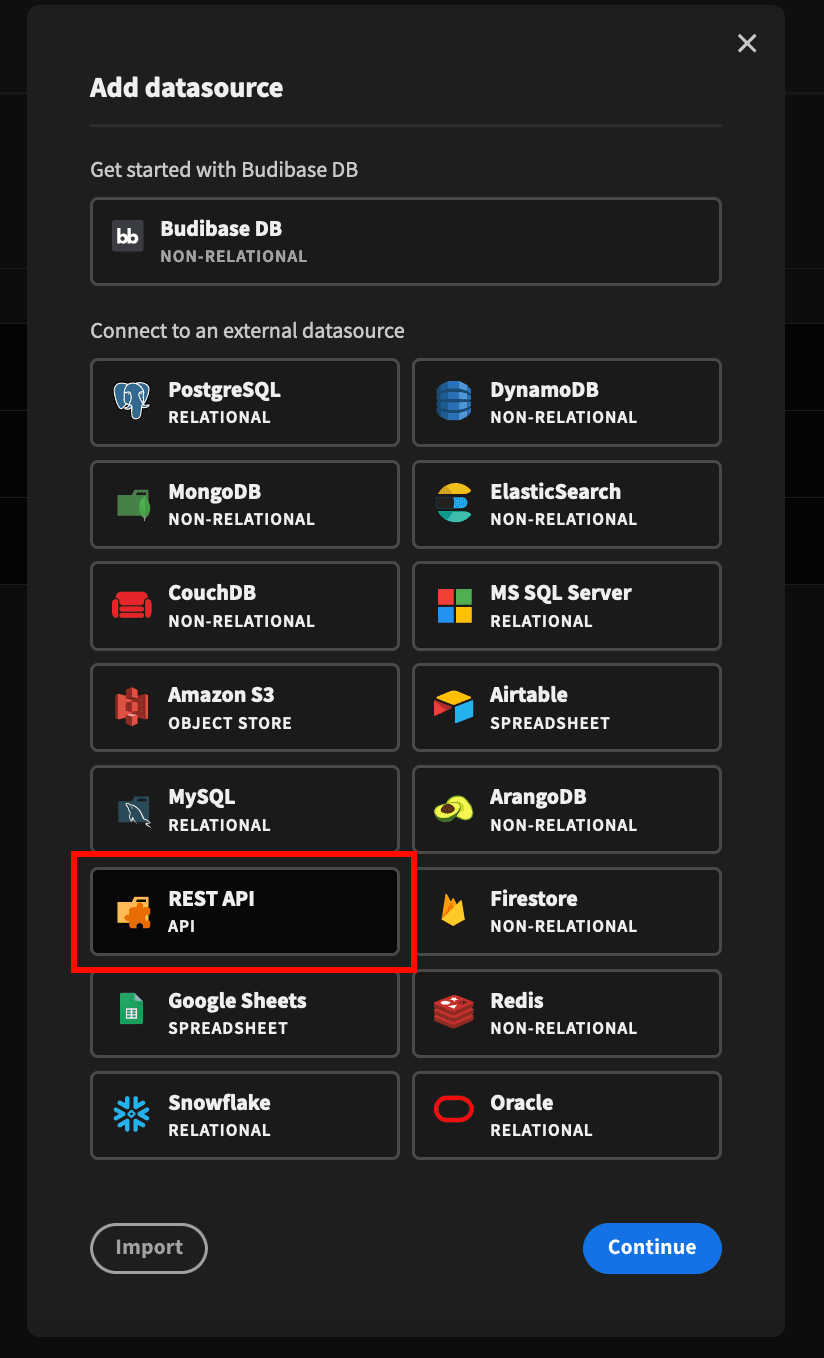
With REST, you can create GET, POST, PUT, and DELETE operations. They work the same way a normal server connection would. In addition, most Elasticsearch commands are the same, whether you are running them from the API or if you are connecting to the database directly.
Therefore, everything we do in our example for the REST API can be replicated on the Elasticsearch data source if you want to.
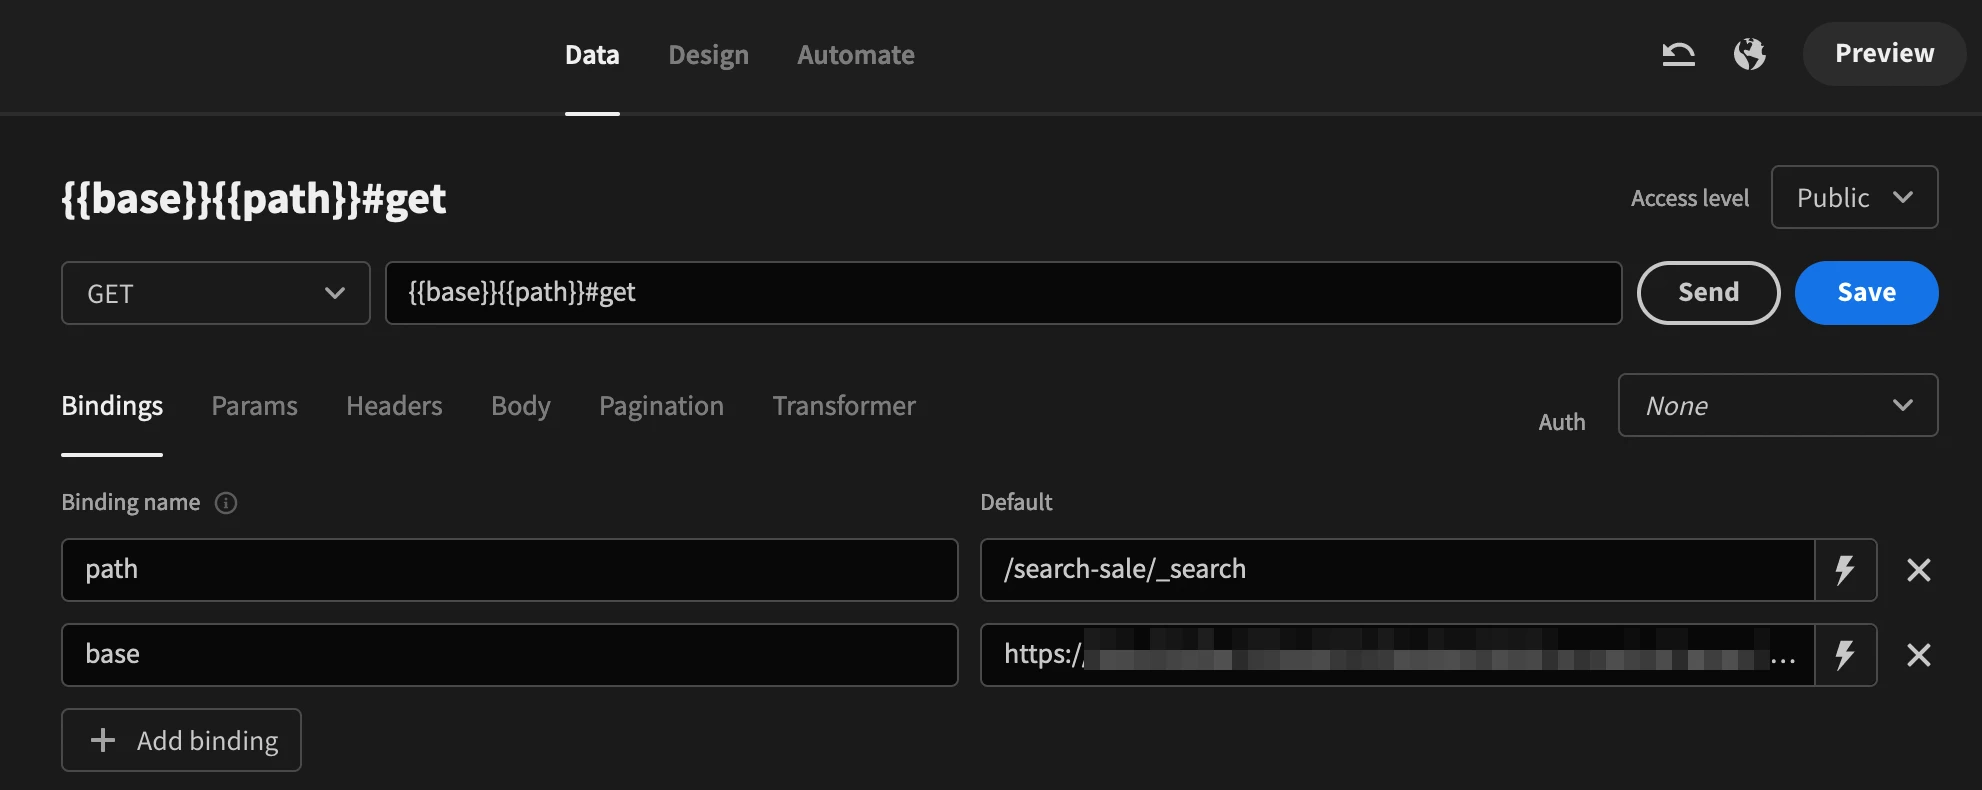
In our demo app we have two REST API connections:
GET {{base}}{{path}}
This is a general GET request, used in the “New GET” screen.
You can also take a look at our guide to building a REST API GUI .
POST {{base}}{{path}}#post
This is a general POST request, used in the “New POST” screen. Use the body as:
{{ Binding.JSON }}
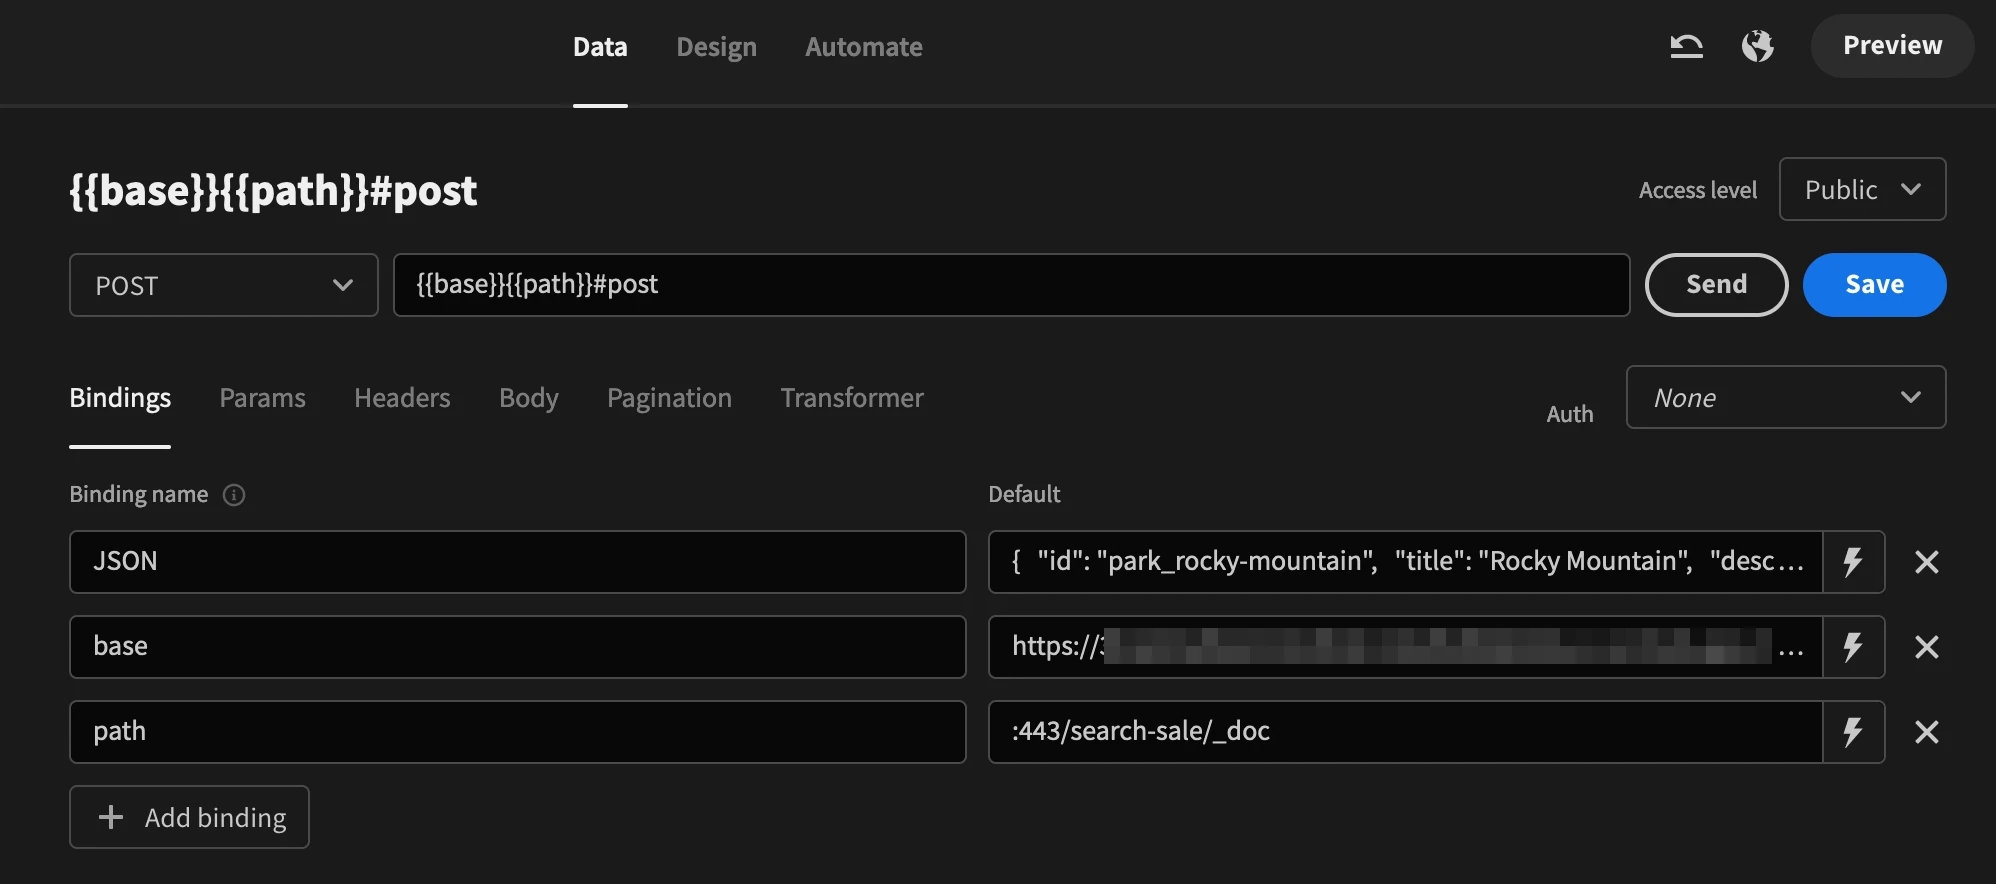
These two requests are flexible and based entirely on the frontend data. The bindings allow you to send requests with data coming from the form fields that we’ll build in a minute.
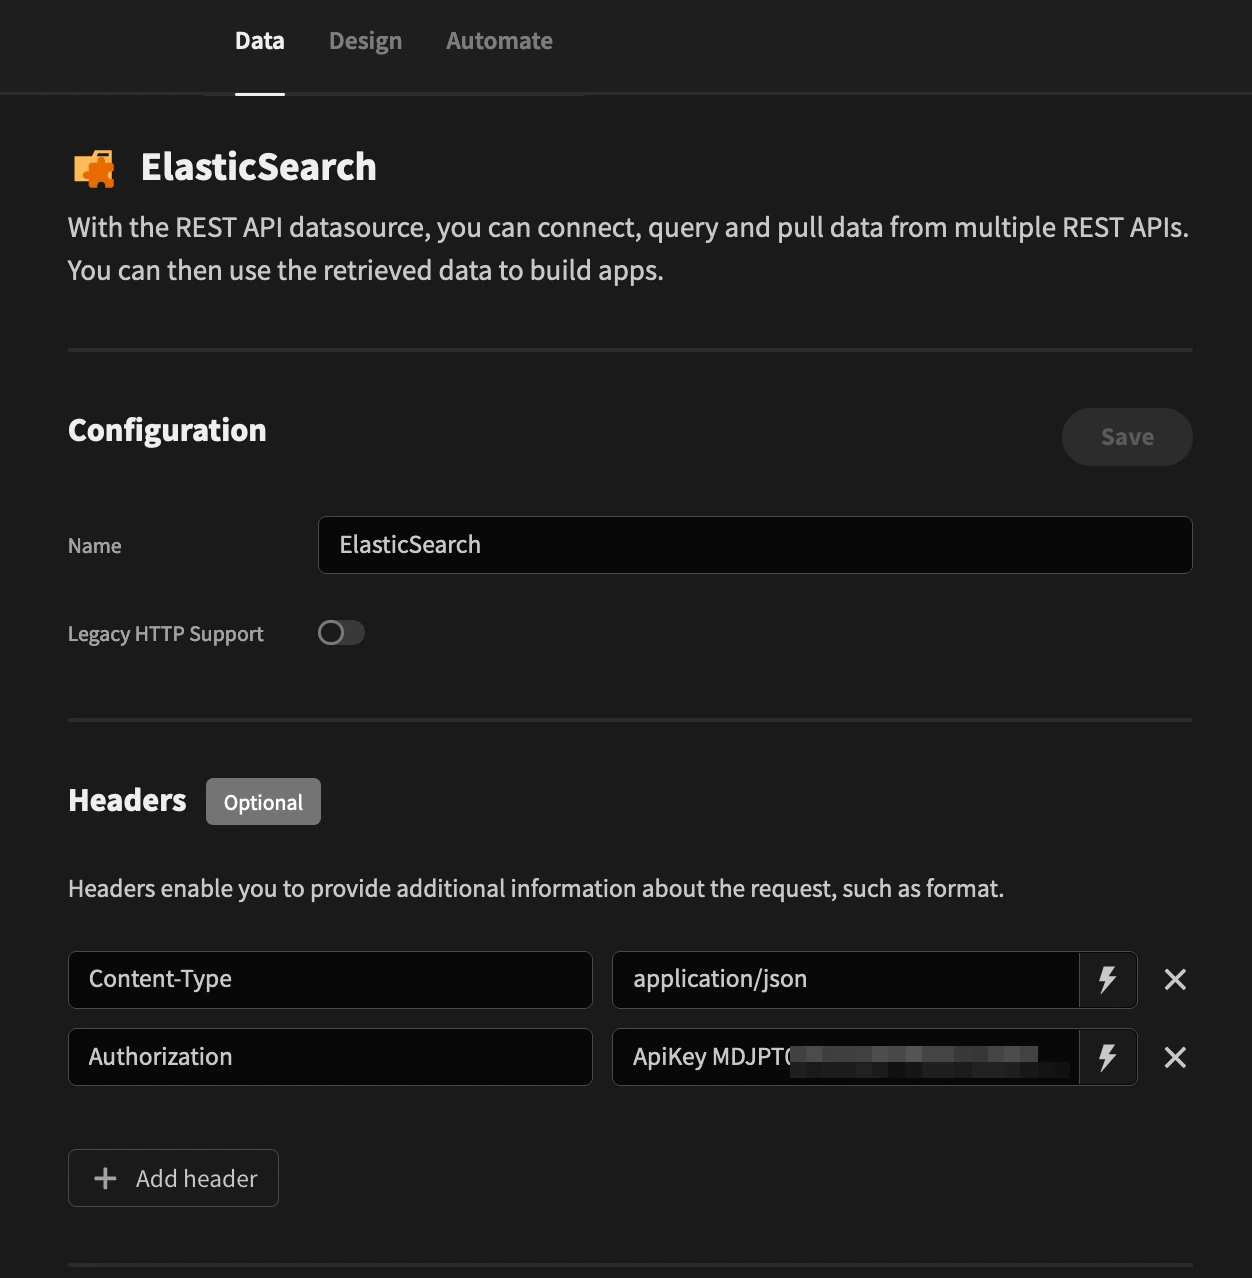
You can use the global REST API settings to add headers that are used by all connections, such as a header for the content type (JSON) and another one for authentication:
In addition to your external data sources, like Elasticsearch, quite often you need internal data in your app.
With it, you can store user preferences or attributes that can make your life easier.
Budibase allows you to use our internal database, BudibaseDB. You can create tables on the fly and use them in your apps.
In our demo, we have two tables. The first table stores the saved queries. They are the ones shown on the main page. That’s where the query goes when you click “save” on the POST and GET screens.
The second table is the settings table. You can use it to store general app options. In our example, we use it just to store the base URL for the REST calls.
You can use this structure for your tables:
Rest_queries:
- Method - GET, POST, PUT or DELETE.
- Path - the endpoint for the API call, such as /search.
- Body - the JSON contents for your call, if any.
Settings:
- Key - a way to identify the setting, so you can load it in your app such as baseURL.
- Value - the contents for that key.
That’s it. Now you have all your data ready, let’s build some screens.
Step 2 - Create autogenerated screens
Go to the “design” tab. This is where you can manage your screens. While you are at it, feel free to explore the leftmost icons - Screens, Components, Theme, and Navigation.

On these menus, you can change different aspects of your app.
- Screens - This is where you create and manage screens, define paths, set your homepage, configure onload actions, and more.
- Components - You can use this page to edit a specific screen, edit components, add new ones, or delete existing screens.
- Theme - Here you can edit general design choices, such as the app theme, colors, and button styles.
- Navigation - This is where you define the navigation menus, and change the header background color, the app name, and the logo.
In our example app, we are using a dark theme. We’ve also added a CSS gradient in the header background.
Let’s create the first screen for your Elasticsearch GUI app now.
Actually, it’s six screens. With just two clicks. Amazing, right?
On the screens menu, click on “Add screen”. Then select “Autogenerated screens”. Select either one of the tables. Then. repeat the process for the second table.
You get three screens to manage each table:
- [tablename]/ - this is the “read” action. In it you can see your table data
- [tablename]/new/row - this is the “create” action. In it you can add new items to your table
- [tablename]/:id - this screen is for the “edit” and “delete” actions.
The :id portion of your URL is actually a variable. It allows you to load data for that item on your screen.
For example, when you send users to the settings/1 page, you are telling Budibase that the item ID is 1. It can then use this information to pre-populate the form fields and correctly prepare the edit form.
You’ll notice that the autogenerated rest_queries screen is quite different from the final design. You can edit these screens in any way you want.
This is the elements tree for the rest_queries page:
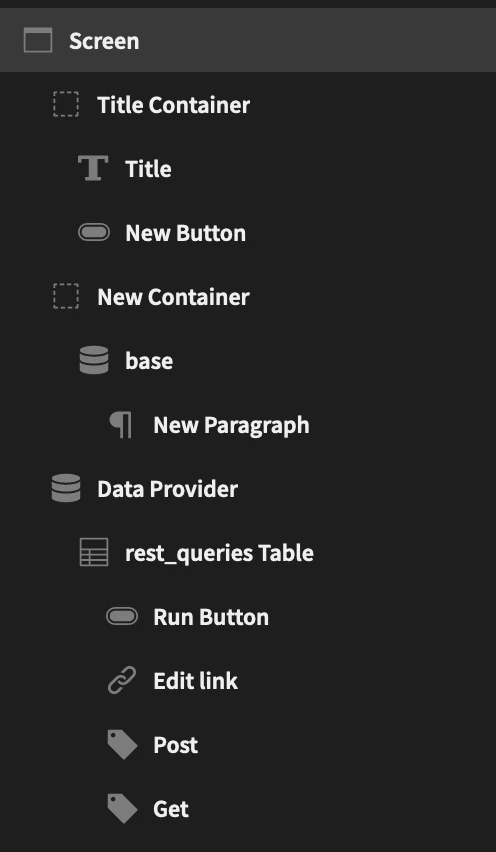
There is a new data provider on that page to display the base URL. You can add a container, then a data provider loading the “URL” view of the settings table.
But what is a view?
Views are filtered subsets of your tables, so it’s quicker to load and reference them.
This is particularly when you know which filters you want to apply. Instead of running a query, then filtering it dynamically, you can create a view.
In this case, since you know that you just need the baseURL from the settings table, you don’t need to load the entire table. You can create a view for it.
You can create a view on the table edit screen (Data > Budibase DB > Settings):

Make sure you add the filtering options (key equals baseURL) and you are all set.
Now you can add a paragraph inside the data provider. In it, you just need to load the value for your baseURL using this binding:
Base URL: {{ base.Rows.[0].value }}
Next, it’s time to add the table components. You can click on the table component and add components inside of it. This renders a copy of that component on each of your table rows.
Add a button component to run the query. Then, you can use the button’s onclick actions to run the query, like this:
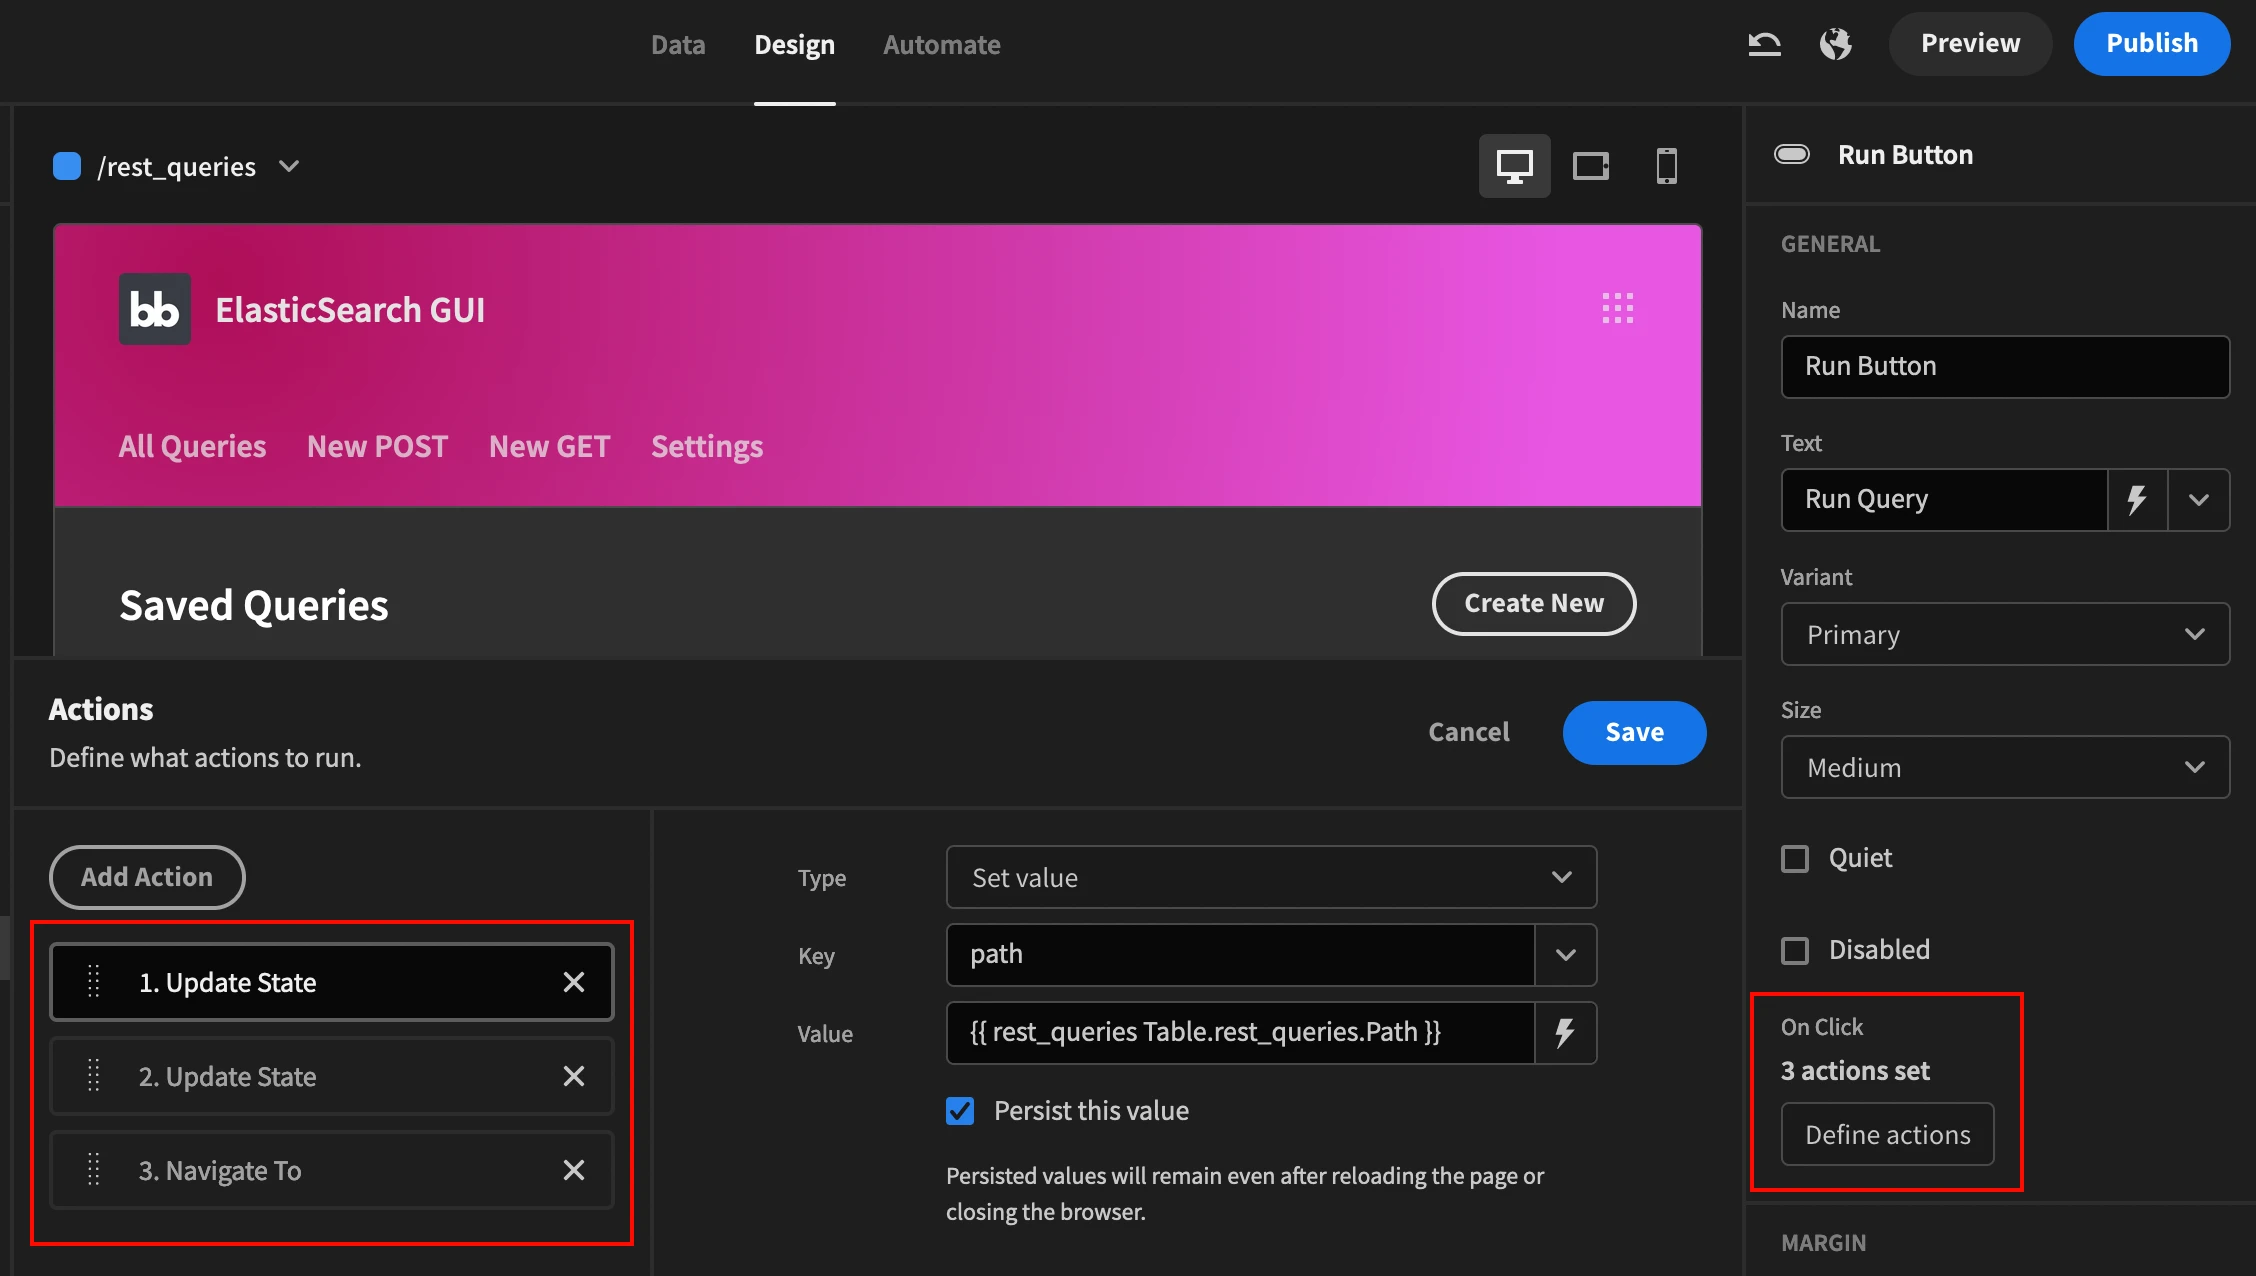
In this case, you’ll use app states to store variables. App states are local variables, stored on the visitor’s browser, that can be used within your app. Here you are going to store a variable for the path corresponding to the current row:
{{ rest_queries Table.rest_queries.Path }}
Then, you can store a variable with the JSON body, called “body”, with a JS function on its value:
1return $("rest_queries Table.rest_queries.Body").replace(
2/[\r\n]/gm, '');
This function gets the value from the table row and removes line breaks. This ensures that your JSON body works as it should.
Lastly, you redirect your visitor with the “navigate to” action. You can use this binding for the path:
/{{ rest_queries Table.rest_queries.method }}
This path redirects your visitor to either the /get or /post screen.
The last custom element on the main table is the “get” and “post” tags. You can add two tag components, one for the “get” display and one for the “post”, each with its own background colors.
Now you just need to use the display conditions to hide or show the component you want:
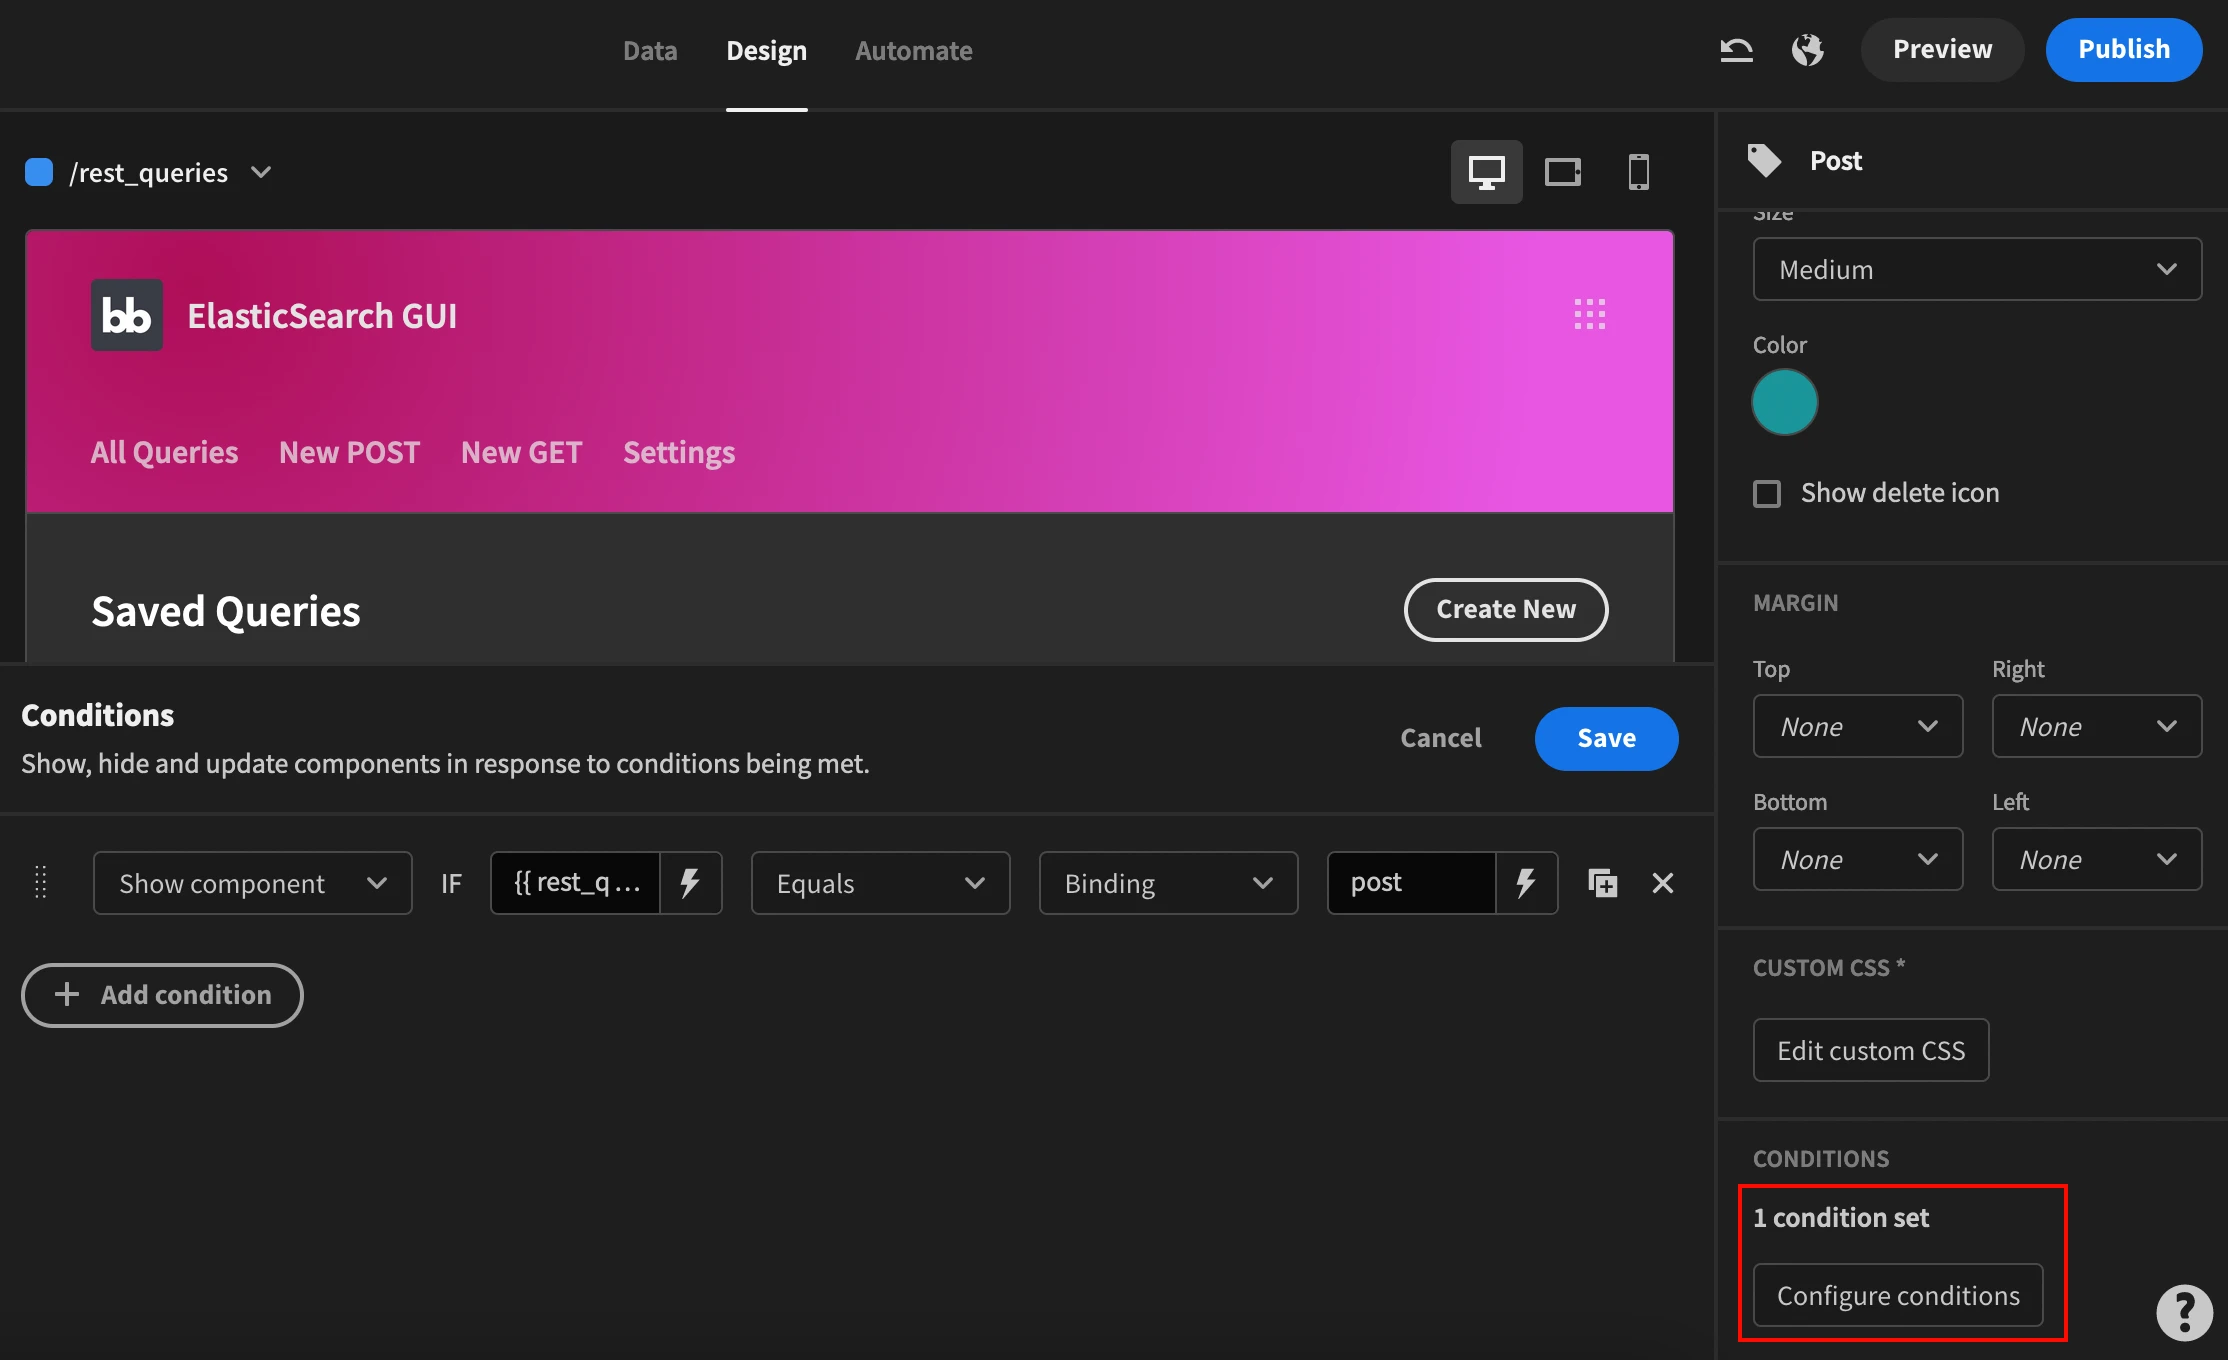
You can use these rules:
- Show component IF {{ rest_queries Table.rest_queries.method }} equals to post
- Show component IF {{ rest_queries Table.rest_queries.method }} equals to get
You can add more tags if you have other methods (such as PUT and DELETE).
Check out our guide to building a Redis GUI.
Now let’s build some custom screens.
Step 3 - Run queries in Elasticsearch - the POST screen
Create a new screen with the “post” route. You are going to use this screen to perform Elasticsearch queries that require a body.
This is the elements tree for that page:

This page contains a form, action buttons, and the output container.
The overall logic is to save the form field values to app states.
Then, the data provider uses the app state variables to perform queries. This ensures that whenever you update the form fields, the output is updated as well.
You can add a form component, then the fields for data entry. On the “run query” button, use these onclick actions:
Update state:
- Set “path” as {{ request data.Fields.Path }}
Update state:
- Set “body” as JS function: return $(“request data.Fields.Body”).replace(/[\r\n]/gm, ‘’);
Update state:
- Set “base” as {{ request data.Fields.base }}
Notice how the body also removes the line breaks to make sure that your JSON body is valid.
The “save” button, has this onclick action:

In this case, you can save the JSON body as it is, and you remove line breaks only when you run it.
Add a data provider with the #post data source. To make sure that the data provider uses the app state values, you can use the following bindings:
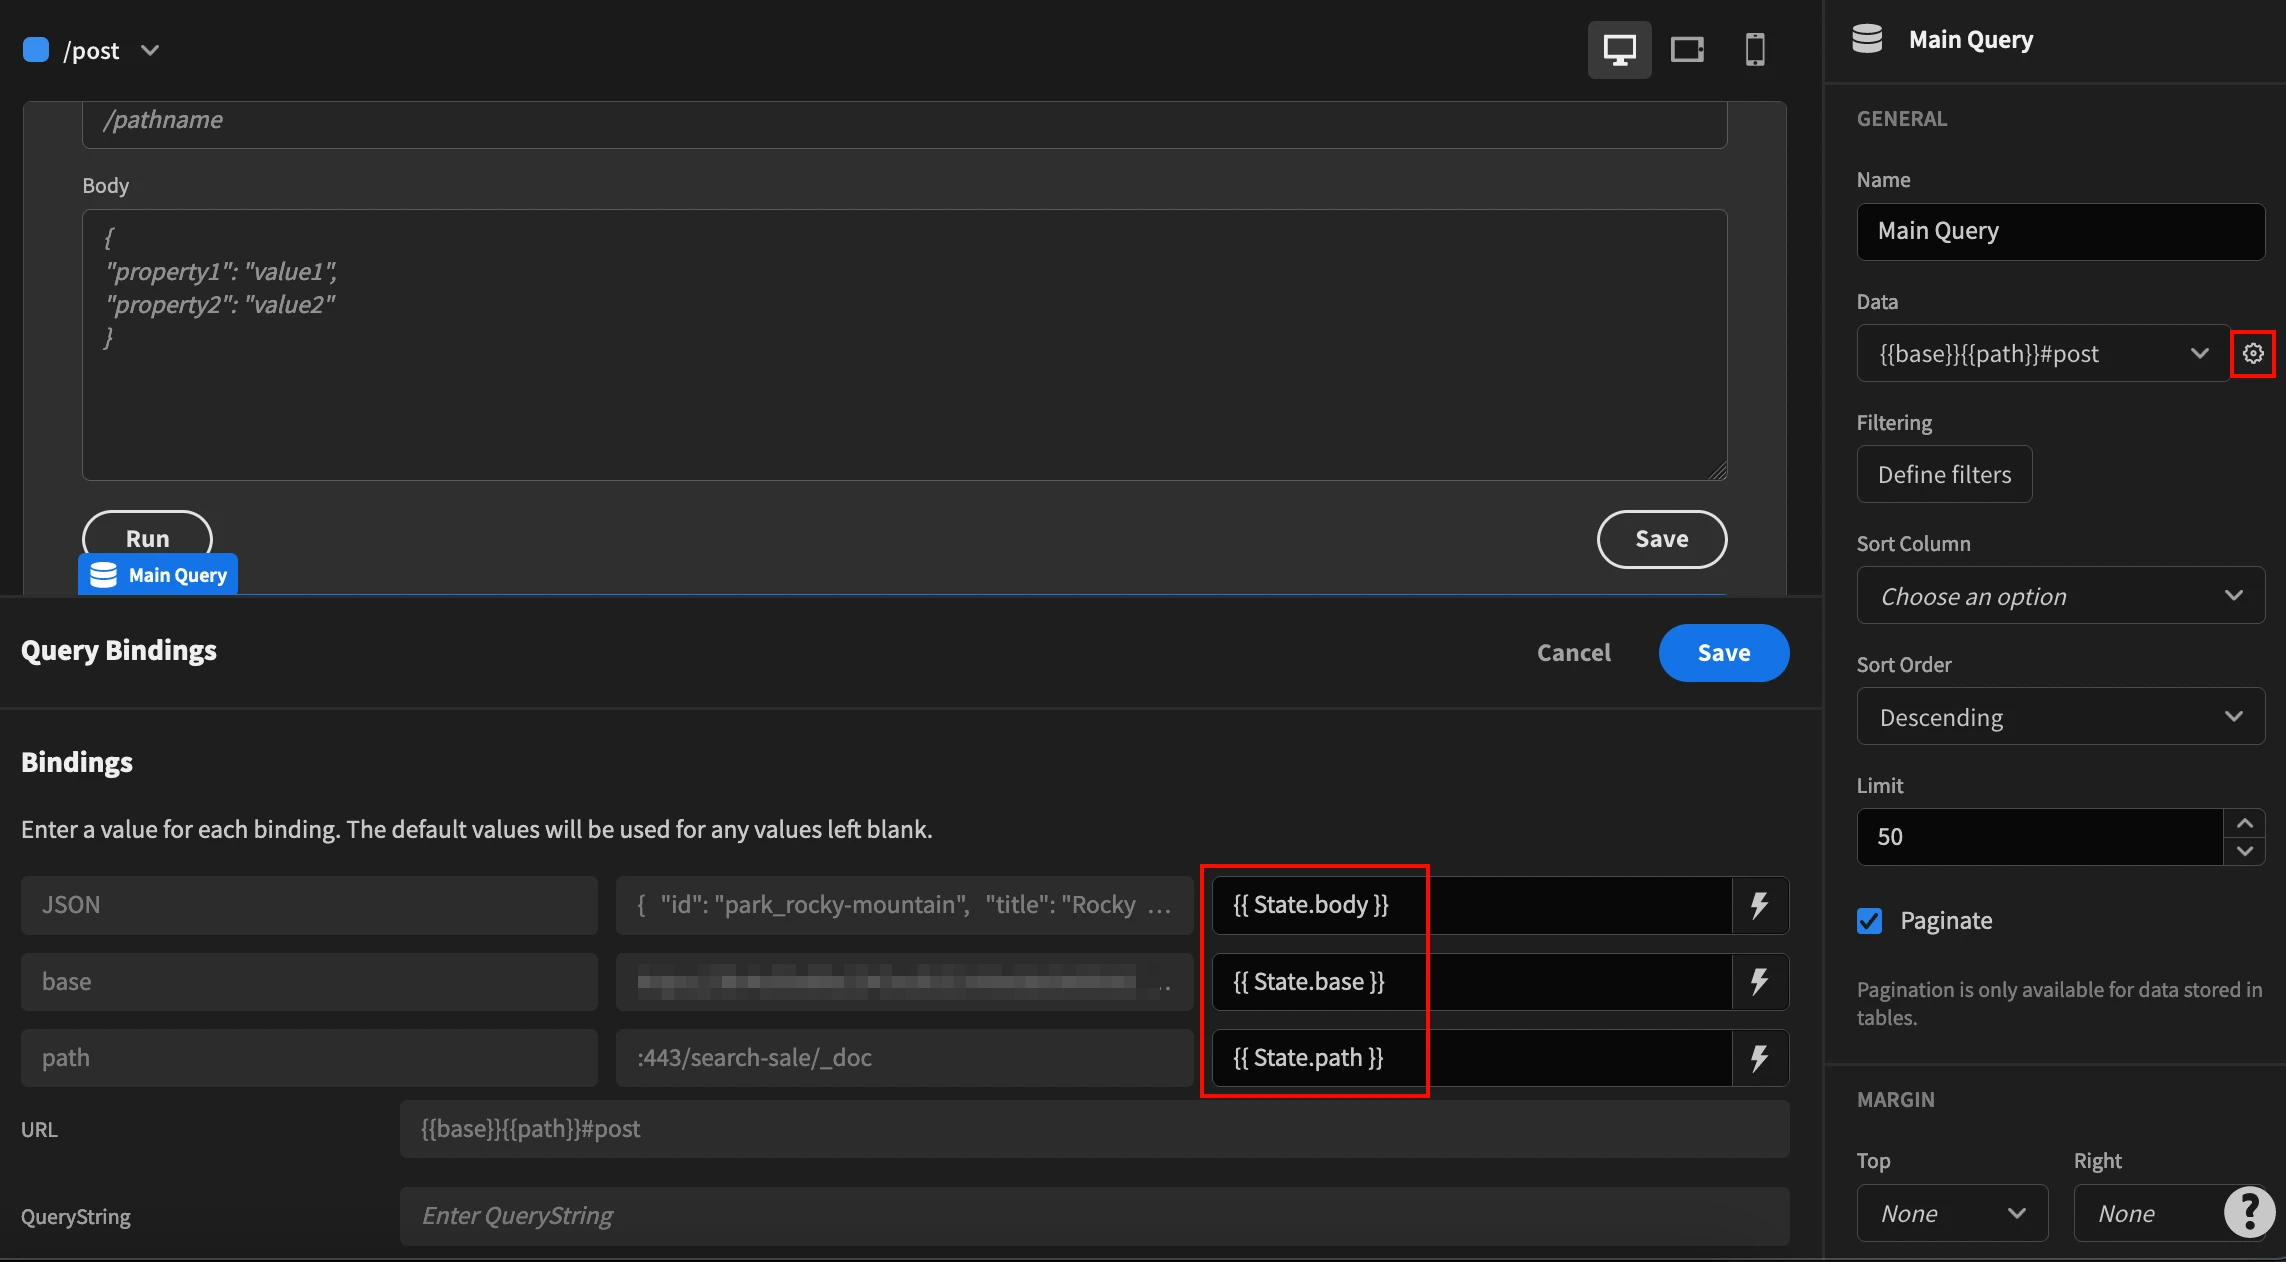
Since the response is a JSON, it makes sense to output its data directly. You can beautify the code output using REGEX and some styling.
Add the embed component. This component allows us to use HTML tags, which are quite useful for styling purposes.
For the embed contents use JS code. You could just output a plain JSON response, with something like this:
1var data = $("Main Query.Rows");
2data = JSON.stringify(data, null, "\t");
3return "<pre>" + data + "</pre>";
This JS code just gets data and turns it into an indented string. To make it prettier you are going to pass this entire string through two functions.
The first function is a REGEX to find and capture the values. Then, you can test to see which type of variable this value is, and format it with different colors. We use tests for strings, boolean, and a fallback (for numbers).
The second function is a REGEX to capture the keys. Then it just wraps the key with some styling as well.
Putting it all together this is the final JS code for the embed:
 1function replaceKey( str ) {
 2
 3return "<span style='color: #a03dfc'>"
 4str + "</span>";
 5}
 6
 7function replaceValue( str ) {
 8str = str.slice(2);
 9var color = "#03f4fc";
10var comma = "";
11if ( str == "{" || str == "[") {
12
13//value type array, no formatting
14str = ": " + str;
15} else {
16if ( str.charAt( str.length-1 ) == ",") {
17
18//if it ends in a comma, remove it
19//from styling and add it back later
20
21str = str.slice(0, -1);
22comma = ",";
23}
24if( str.charAt(0) == '"' ) {
25
26//if it's a string, #3dfca0
27color = "#3dfca0"
28} else if( str == 'false' ) {
29
30//if it's a boolean false, #ff0000
31color = "#ff0000";
32} else if( str == 'true' ) {
33
34//if it's true, #03fc5e
35color = "#03fc5e";
36}
37
38//build the formatted value
39str = ": <span style='color: " + color + "'>"
40str + "</span>" + comma;
41}
42return str;
43}
44
45var data = $("Main Query.Rows");
46data = JSON.stringify(data, null, "\t");
47data = data.replaceAll(/[:]\s(.*)/g, replaceValue);
48data = data.replaceAll(/("[^"]+":)/g, replaceKey);
49return "<pre>" + data + "</pre>";
You could use other representations if you want. You could use tables, repeaters, or even custom components. This is just an example so you can see how to extract data from the data source in general terms.
Step 4 - GET requests with Elasticsearch
Finally, there’s the GET screen.
This is actually a copy of the post screen, but with fewer options. Which makes your life much easier.
You can just duplicate the post page, and use the route /get for it.
Then delete the body field, and update the action buttons as well as the data source.
Don’t forget to make sure that the save button saves it with the “get” method. Then, change the data source to load the #get request.
That’s it. You are ready to run your GET requests as well.
How to build an Elasticsearch GUI in Budibase
Today we looked into how you can create your own Elasticsearch GUI for free, without coding.
You learned many aspects of building apps with Budibase, such as how to connect with data sources, how to use the Budibase DB, how to generate screens and how to manipulate output data.
Check out our in-depth guide on how to create a data model .
We hope you enjoyed it, and see you again next time!
If you found this tutorial helpful, take a look at our ultimate guide to building a database GUI in Budibase.